テキストエディタ Atom を使う
天才エンジニアに、Atomが良いですよとオススメされたので、以前から使っていたBracketから、Atomに切り替えました。プラグインが充実しているようです。
FTP機能を使って、Atomから直接サーバー上のファイルの書き換えができるプラグイン。
1) Atomのsettingから検索してEnable

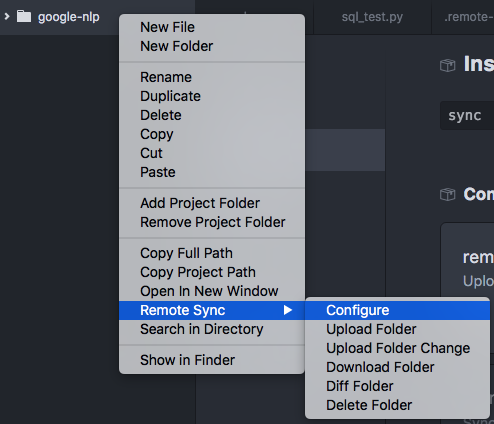
2) プロジェクトフォルダーから、右クリックでRemote Sync -> Configure
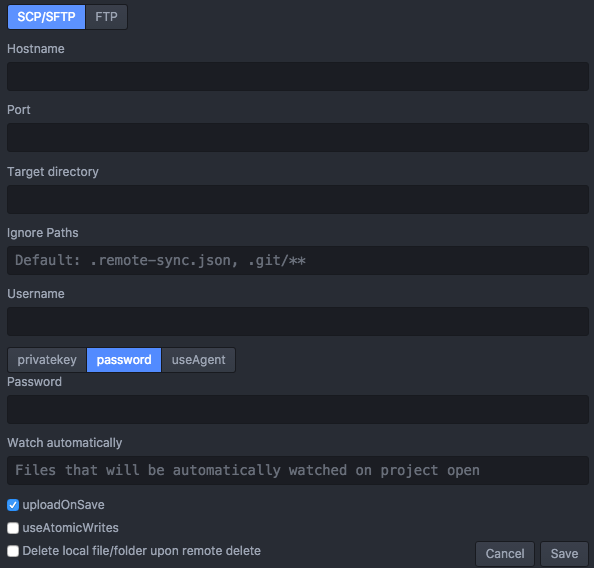
3) サーバー情報を入れて完了!
おまけ:ターミナルから直接Atomを開く方法
atom . //今いるディレクトリーでatomが立ち上がる
Google クラウド自然言語APIを実装する① Pythonを使う
前回は、クラウド自然言語APIをcURLで活用してみましたが、実際のサービスに実装するにはどうしたらいいのかなと、困っていました。
弊社の天才エンジニア救世主に教えを被り、順調に進めることができました。横でコーディングを見ているとマジで惚れます。萌えます。あーー。
Google先生が、GitHubにPythonを使ったクラウド自然言語APIの実装例が載せていたので、これを参考にしながら、進めていきます。
python-docs-samples/language/api at master · GoogleCloudPlatform/python-docs-samples · GitHub
まずは、Python環境を作る
1) pyenvをインストール
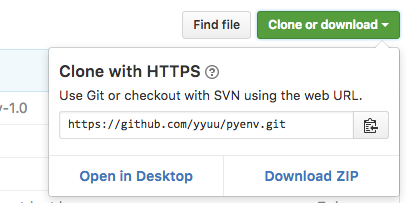
pyenvとは、Pythonの様々なversionの環境を作ることができるもの。githubからインストールすると、home下に環境が作られます。
pyenv lets you easily switch between multiple versions of Python. It's simple, unobtrusive, and follows the UNIX tradition of single-purpose tools that do one thing well.
というわけで、terminalを立ち上げてコマンド入力。
cd $HOME
git clone https://github.com/yyuu/pyenv.git ~/.pyenv
echo 'export PYENV_ROOT="$HOME/.pyenv"' >> ~/.bash_profile
echo 'export PATH="$PYENV_ROOT/bin:$PATH"' >> ~/.bash_profile
echo 'eval "$(pyenv init -)"' >> ~/.bash_profile
exec $SHELL
pyenv install 2.7.12
pyenv global 2.7.12
pyenv rehash
これで、home下にpython環境ができました。
2) pythonの基本文法
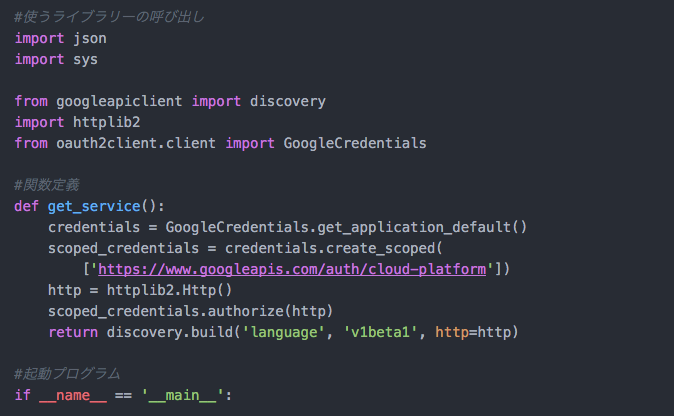
.py : Python fileの拡張子
import : ライブラリー呼び出し
def xxxx(): :関数定義
if __name__ == '__main__': :起動プログラム。これがないと何も動かない
3) terminalで動かす
Python fileのあるディレクトリーまで移動し、そこで、以下を叩くことでファイルが起動されます。print()で出力することができます。
python test.py
こんな感じでござる。
Google Cloud Natural Language API(クラウド自然言語API)に触れる
さて、今週末はGoogle自然言語APIを触ってみました。すでに公開していたPrediction APIについては以下より。
Googleのホームページに載っていたquick startに従ってすすめていきます。curlを使っての手順になっています。要はterminal/ linuxコマンドを使った手順です。
1) Google Could SDKをインストールする。
以下のページが解りやすかったです。googleのサイトにzipも上がっていますが、ターミナルからの方が楽です。
Google Cloud SDKのインストールと認証の設定について - TASK NOTES
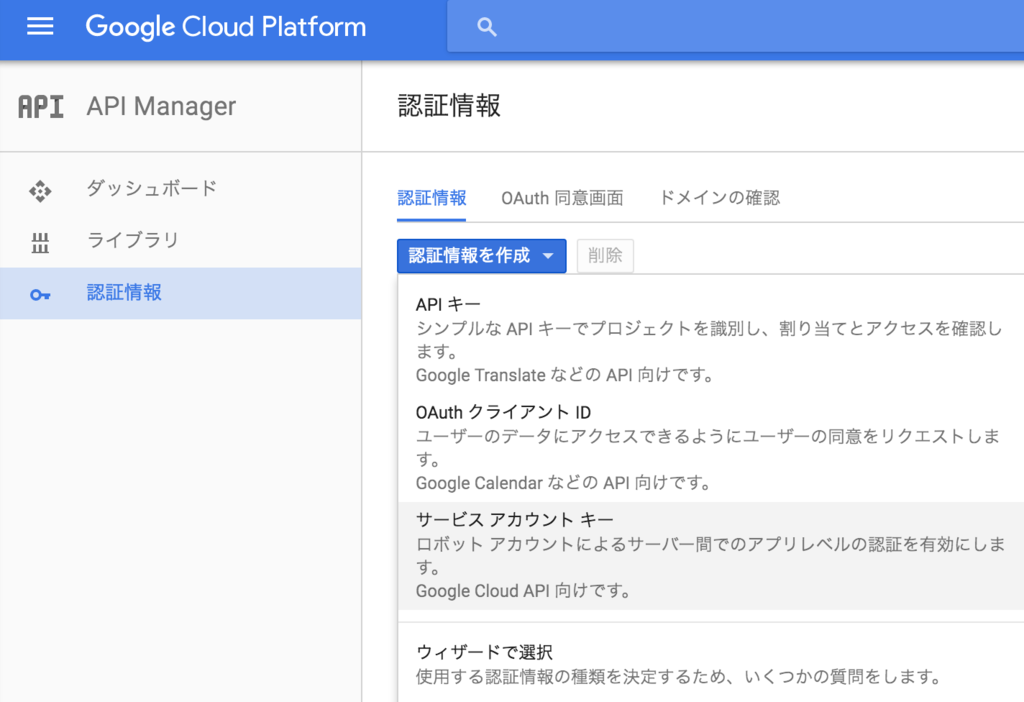
2) サービスアカウントを作成する
API Managerから、サービスアカウントを作成します。Google Could APIを使うときは必要になるようです。作成すると、json形式のaccount keyが生成されるので、大事に保管。
3) json形式で分析したい文章のfileをつくる
先日決算のあったFacebook COOのシェリルサンドバーグの決算に対する投稿を使ってみます。
{
"document":{
"type":"PLAIN_TEXT",
"content":"Today we shared our quarterly results and announced that there are now 60 million businesses using Facebook Pages each month. Facebook and Instagram have become the mobile presence for businesses around the world — and we are grateful that businesses large and small are using our products to connect to their customers."
},
}
4) 分析したいjsonファイルのあるディレクトリーまで移動する
コマンドは、”cd”で移動です。
5) アクセストークンの入手
$ gcloud auth activate-service-account --key-file=service-account-key-file //アカウントキーの場所をいれる$ gcloud auth print-access-token
access_token //アクセストークンをget入手する。
6) 分析!
$ curl -s -k -H "Content-Type: application/json" \
    -H "Authorization: Bearer access_token" \
    https://language.googleapis.com/v1beta1/documents:analyzeEntities \
    -d @entity-request.json //分析したいjsonファイル名
7) 結果
{
"documentSentiment": {
"polarity": 0.3,
"magnitude": 1.2
},
"language": "en"
}
- Polarityとmagnitudeの2軸での評価のようです。
- Polarity:方向性、極性という意味。+1 から -1の範囲をとる
Magnitude:強さで、0 から +無限大 をとる。文章が長いとMagnitudeが上がる傾向がある
ということらしい。
ということは、Sheryleの投稿は、positiveっちゃpositiveだけどけっこう冷静な感じ といったところでしょうか。まーそんなもんですね。
所感:
これをサービスに実装するとなると、json形式のファイルを一度生成した上でぶっ込んでいく感じでしょうか。
Facebookのページコメントを自動で分析する場合は、
- Facebookページコメントを引っ張る
- json形式ファイルを一個ずつ作成
- 一個ずつAPIにアクセス
という感じ?
あと現在はsentiment analysisは、英語サポートのみです。
以下、googleのページから引用
Interpreting Sentiment Analysis Values
A document with low magnitude generally indicates a low-emotion (neutral) document. A document with low polaritymay also indicate a neutral document, but can indicate a document of mixed emotions, with both high positive and negative values which cancel each out. Generally, the combination of
polarityandmagnitudeprovides you with the best evaluation of a document's overall sentiment.The chart below shows some sample values and how to interpret them:
Sentiment Sample Values Positive "polarity": 0.8,"magnitude": 3.0Negative "polarity": -0.3,"magnitude": 4.0Neutral "polarity": 1.0,"magnitude": 0.0Mixed "polarity": 0.0,"magnitude": 4.0When comparing documents, multiplying
polarityandmagnitudecan provide a rough comparison of the sentiment, provided that you are analyzing documents of similar length.
Google Predition APIに触れる
今月はGoogleがクラウド自然言語APIを公開したことが話題になってましたね。
文章からセンチメント(ポジティブかネガティブか)の判断を返すAPIも公開されたようで、ソーシャルメディアを使っているマーケターには朗報です。
以前からpredition APIは公開されていましたが、こちらは学習モデルのみで学習データは自分で集めて精度を上げていかなければいけないようです。
例えば、以下のようにFeeling kind of low....は"悲しい"、OMG!は"興奮している"、Eating eggplant.は"つまらない"のようにラベリングされたデータセットが必要です。
"sad", "Feeling kind of low...."
"excited", "OMG! Just had a fabulous day!"
"bored", "Eating eggplant. Why bother?"
ひとまず、Predition APIを以下の手順でいじってみました。週末は自然言語APIを触ってみようと思います。
手順
1) アカウントをつくる
2) Projectをつくる
3) Projectに紐づいたCloud Strageを作る
4) Cloud Strageに学習データをuploadする
5) API explorerでいじる
Tool
Google APIs Explorer:APIを試すためのページ
Google Cloud Platform:コンソールページ
Prediction API 参考ページ
google prediction APIの使い方 - 困ったー:わかりやすい
https://cloud.google.com/prediction/docs/hello_world:Google公式の解説
https://cloud.google.com/natural-language/docs/getting-started:自然言語APIの解説
自然言語API 参考ページ
https://cloud.google.com/prediction/docs/sentiment_analysis:Google公式の解説
Facebook API 入門
Facebook APIの規約について質問を受けました。海外のプラットフォームの場合、開発者向けサイトは翻訳されていなく、そしてだいぶ曖昧な表現が多く読んでもイマイチわからない。というケースがよくあります。
そんなときは、自分で使ってみるのが一番早い。とはいえ、developer登録してaccess tokenとapp IDを発行して、、と手間がかかります。というわけで、プラットフォームが用意している以下のようなAPIお試しツールを使いましょう。
Facebook Graph API Explorer: https://developers.facebook.com/tools/explorer
Twitter API Concole Tool: API Console Tool | Twitter Developers
例:アプリがFacebookの友達リストを入手するための必要条件は?
Step.1: 開発者ページからHTTP APIリクエストのコードを入手
Facebook開発者ページから、friend情報に関するAPIのページをさがします。どうやら、"API用URL/{user id}/friends" と入れると、friend listが返ってくるようです。

Step.2: 上記のFacebook Graph API Explorerに行って、実際にsubmitする
friend listが出てきません。あれれ。

Step.3: Step.1とStep.2を繰り返す。
ページに戻ると以下のように書いてあります。
- A user access token with
user_friendspermission is required to view the current person's friends.- This will only return any friends who have used (via Facebook Login) the app making the request.
- If a friend of the person declines the
user_friendspermission, that friend will not show up in the friend list for this person.
なるほど。user_friends permission が必要なようです。というわけで、Graph API Explorerに戻って、”Get Token”をクリックして、”Get User Access Token”をクリックします。指示通り、user_friendsを選んで”Get Access Token"!

そして、me/friendsと打って"submit"とすると、自分の友達リストが出てきたと思います。しかし、以下のdebugメッセージも出てきました。

- Only friends who installed this app are returned in API v2.0 and higher. total_count in summary represents the total number of friends, including those who haven't installed the app.Learn More
- Friend list is no longer part of the default permission set and has its own permission: Asking for access to a person's friend list is now a separate permission that your app must request. The new permission is called
user_friends.- Friend list now only returns friends who also use your app: The list of friends returned via the
/me/friendsendpoint is now limited to the list of friends that have authorized your app.
結論:API v2.0以上では、アプリにuser_friends permissionを付与したユーザーしかfriend listには引っかからない(つまり全ての人がそのアプリにFacebookログインして、user_friends permissionを付与しなければ、全ての友達関係は入手できない)。
試しに、実際のテストアプリ(友達だれもログインしてない)でme/friendsをsubmitしてみると、以下のようになりました。
Tips: 右上のApplicationのドロップダウンメニューでGraph API Expolerから自分でdeveloper登録したアプリに切り替える。


Facebook APIのまとめ
- 困ったらdeveloper pageでAPIを確認
- Facebook Graph API ExplorerでAPIの挙動を確認
- 実際のアプリでの挙動を確認したい場合は、実際に登録したアプリに切り替えてAPI Explorerで確認
FBアクセストークン確認ツール:
https://developers.facebook.com/tools/debug/
こんな感じカニ。
XMLの取り扱い
APIを色々いじっている最近ですが、ついにXMLに出会いました。
JSONと勝手が違い躓いてしまったんで、記しておく。
1. file_get_contentsではなくcurlを使う。
htmlheaderにアクセストークンを仕込んでJSONと同じようにfile_get_contentsで一発だぜと思っていたのですが、どうしてもうまくいかない。curlを使って解決。
$url = 'https://product-search.api.cj.com/v2/product-search?'.
'&keywords='. rawurlencode($_GET['keywords']);
$curl = curl_init($url); // 初期化
$options = array(
//HEADER
CURLOPT_HTTPHEADER => array(
"Authorization: トークン",
),
//Method
CURLOPT_HTTPGET => true,//GET
);
//set options
curl_setopt_array($curl, $options); /// オプション値を設定
curl_setopt($curl, CURLOPT_RETURNTRANSFER, true);$result = curl_exec($curl); // リクエスト実行
$result2 = simplexml_load_string($result);
2. XML Objectを配列にパースする
ここで、$resultには、XML Objectという形でデータが入っています。foreachで値を取り出せるかなと思いきや、ダメでした。JSONを経由させて配列にかえます。
$json = json_encode($result2);
$array = json_decode($json,TRUE);
これで配列になりました。もーみんなJSONでいいじゃん。。
JSONの扱いかた
APIでデータを引っ張ってくるとたいがいJSON形式で返ってきます。JSONデータをサーバーサイド(php)で扱う場合と、フロントサイド(javascript/ Jquery)で扱う場合をまとめます。
JSONをPHP内で扱う
$api = file_get_contents(APIのURL); //この時点ではstring型のjson
$arr = json_decode($api); //ここで、String型のjsonがArray,配列になる
foreach($arr as $value){
}; //配列をまわして値を取り出して行く
JSONをjsで扱う
$.ajax({
url: "insta_hashtag.php", //PHPファイルのURL
type:"GET",
dataType: "json", //apiで返ってくるデータの形式を指定}).done(function(data){ //通信成功時の処理
$.each(data,function(i,item){
//配列をまわして値を取り出して行く});
}).fail(function(){ //通信失敗時の処理
}).always(function(){ //通信完了時の処理
});
foreach, $.eachを活用して効率よく抜き出して行くことが重要です。